There are a lot of decisions that you need to make when starting out that will determine how easy your job is. File management and photo storage is a piece of the puzzle where you will either have it organized and don’t have any issues, or you’ll make it more difficult than it needs to be and time will be wasted. From choosing the right memory cards to storing and organizing the photos on your computer, every decision makes a difference.
Real Estate Photography Tutorial – File Management – Start to Finish (you are here)
Real Estate Photography Tutorial – Prep and Settings
Real Estate Photography Tutorial – Shot List and Guide
Real Estate Photography Tutorial – Software Setup for Post Processing
Real Estate Photography Tutorial – Editing With Lightroom And Enfuse/HDR

 Buy Good Memory Cards
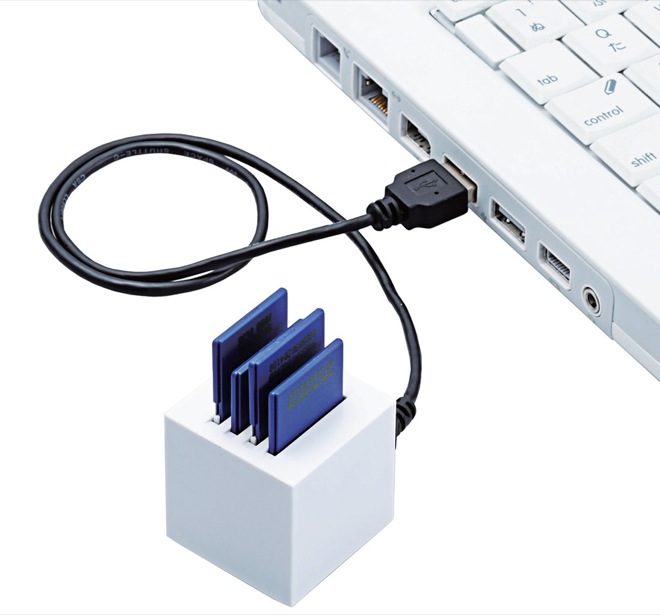
The memory card is one of the tools we use as real estate photographers that is one of the most important parts of our business. Just like our camera equipment, if our memory card fails us, we potentially lose work. It may take trial and error to find the best memory card for you, but I’ll share what I found in hopes that it will make your decision easier.
When I first started out I bought some PNY fast “Video” memory cards. They were cheap during a sale so I picked up a few. They worked fine at first for my still photos, until I tried to use them for video. I was hired to record a real estate agent during a radio interview, so I set up two cameras at different angles. The red ON AIR sign flipped on, and I began to record the show. On one camera, everything went smoothly, however on the other one I would hit record, and then it would immediately stop! It took 3-4 times of restarting before it would successfully record! Talk about a heart attack – there I was in a live radio show hired to record a one-time deal and my equipment is failing!
Immediately after returning home from that radio show I purchased new cards that I still use to this day without trouble: SanDisk Extreme SD and SanDisk Extreme CF. (Note: My SD cards are 30MB/s and my CF cards are 60MB/s. It appears 45MB/s is quite popular in the SD lineup as of this writing so I would recommend that speed of card.)
Format In Your Camera
Before you start a day of shooting, format your memory card. Avoid formatting it from within your computer. Instead, put the card in your camera and format it through your camera’s menu. Formatting before you start for the day solves a couple of potential problems.
- Running Out of Space If you have shoots on your card from the previous day, you may run out of space in the middle of shooting. You’ll either have to delete photos one-by-one from your camera to free up space, or you’ll need to switch cards mid-shoot.
- File Corruption I once had 6 frames from a shoot become corrupt and unreadable when I got back to my computer. I strongly believe this was a result of pulling the memory card out of the computer without ejecting, and not formatting the card beforehand. The same card has worked flawlessly since I started formatting consistently.
Create an Organized Folder Structure
An organized folder structure will allow you to easily access files in the future and find past photo shoots without any delay. I put all of my photo shoots in a main folder, and use the following structure:
YYYYMMDD-StreetAddress-City-State-Zip/ (base directory)
YYYYMMDD-StreetAddress-City-State-Zip/YYYYMMDD-StreetAddress-City-State-Zip (Lightroom catalog)
YYYYMMDD-StreetAddress-City-State-Zip/Originals (camera RAW files)
YYYYMMDD-StreetAddress-City-State-Zip/Full (full-size edited JPGs)
YYYYMMDD-StreetAddress-City-State-Zip/Small (small/compressed edited JPGs)
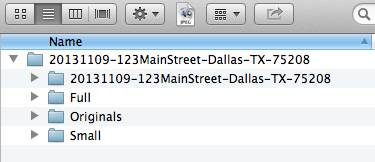
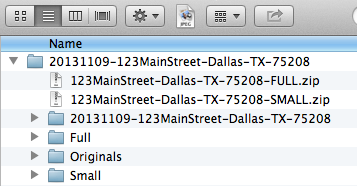
If I were to schedule a shoot on November 8, 2013 at 123 Main Street in Dallas, Texas, my folder setup would look like:
One Lightroom Catalog Per Shoot
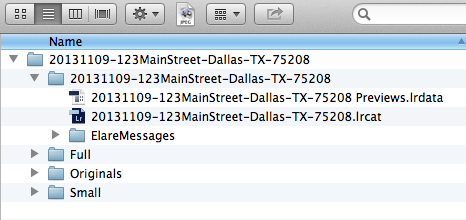
When I first started I maintained a single catalog for all of my real estate photography shoots. The catalog quickly grows and Lightroom tended to slow down and not be as responsive. Now I create a new catalog for every shoot and I store it directly in the base directory. I name it the same as what the base directory is named also. Here’s an example where you can see the catalog directory expanded.
A benefit of creating a new catalog for every shoot is the entire catalog + originals can be removed to save space once the project is edited. If you maintain a single catalog and
remove the photos from your computer, you’ll need to then remove them from within the catalog and it’s just an extra step.
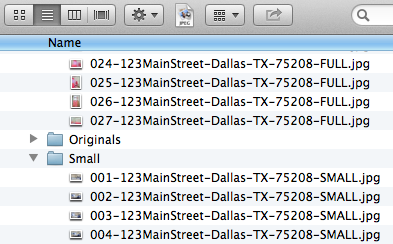
File Naming
For 99% of my clients, I name the files after the property. I think this is helpful to the agent as at any given time they will have multiple properties and they can quickly know which photos belong to each of their properties. There is only one client that requested a different naming structure, where each photo is named after the space (Entry, Formal Dining, Formal Living…etc). Here is how I name the photos:
001-StreetAddress-City-State-Zip-FULL.jpg
002-StreetAddress-City-State-Zip-FULL.jpg
003-StreetAddress-City-State-Zip-FULL.jpg
004-StreetAddress-City-State-Zip-FULL.jpg
…
I start the photo name with a number because that allows the computer the maintain the order of the photos. I finish the photo name with either FULL or SMALL depending on which version it is. Here is a look at the some of the photos within their respective folders:
File Packaging/Delivery
I simply zip up each group of files and provide the agent with the zip files for download. This way if they don’t need to download the full size images they don’t need them.
Cleanup
Deletion of files only happens after the photos have been completely edited. This includes the original photos on the memory card. If I need to use the memory card for another shoot before I have a chance to edit the photos that were on that card, I use a new card. You never know when you might accidentally delete photos from your Lightroom catalog and need to grab the originals again off the memory card.
To save space, I also remove the Lightroom catalog directory as well as the Originals directory, which holds all of the RAW image files. The odds of an image needing an adjustment where the RAWs are required, is very slim. It’s a risk I’m willing to take. With real estate photography, I find that once the photos are edited, rarely do I ever have to go back to them for any type of editing.
Archiving
Backups of the photo shoots happen weekly. I copy the base directory of each shoot (which includes the resulting FULL/SMALL size JPGs, but no original RAW files) to two locations:
- An external HDD plugged into my system (WD My Passport 1TB, $76.90 from Amazon.com)
- A local separate server with RAID HDD storage (for redundancy)
Additionally I host the edited zip file packages on my website for the agents to download, so I consider that as a third backup location. Both of my backup locations above are in the same physical space, so it’s always a good idea to maintain a backup off-site somewhere. The zip file packages on my website are maintained for ~2 months before they are removed to recover space. If an agent needs to access the photos after 2 months time they can contact me to pull them off my local archive, however it is the responsibility of the agent to maintain their own files once downloaded and they shouldn’t rely on me to recover them.
Lance,
I happened upon your site(s) last night and so glad that I did! I don’t use Lightroom Enfuse that often, as I use multiple strobes for my real estate work most of the time. However, I do use HDR from time to time and have always been frustrated with the way Photomatix/Tonemapping/Exposure Fusion make my images look. I’ve heard good things about Lightroom Enfuse, so after searching on YouTube, I found your video and am glad I did.
One question for you…I understand everything above regarding your file management and naming conventions, but the one thing I’m having trouble understanding is how you actually create the master folder. Do you manually create it and import your images from your card into the originals folder OUTSIDE of Lightroom? Then you simple import the images and create your new library after that? I don’t see anything about when/where/how you actually create the master folder that contains all of the subfolders and files.
What am I missing?
Thanks!
Jake
Hi Jake,
Glad you found the video! When are you going to teach me how to use multiple strobes? 🙂 We have huge homes and a lot of them are caves with dark wood/brick here in the Dallas area so I’ve never been able to conquer strobes. Would love to some day to bump up quality!
I create the main master folder manually myself, and then copy the images in from the card. Then I move into Lightroom to create the new catalog and import the images from the Originals folder.
Good question – and good luck!
Lance
Great…thanks. That’s what I thought, but just wanted to make sure.
I made the switch to strobes almost a year ago. A bit of an investment, but worth it in terms of the way my images now look. Trade-off, however, is time on site. I know real estate photographers here in Atlanta that can get in and out of a house in 30-45 minutes because they shoot HDR. Depending on the size of the house, it can take me anywhere from 1.5 – 3 hours. If I can make Lightroom Enfuse work for me (thanks to your videos), I might save the strobes for the really high-end homes or tough lighting situations.
I’m also interested in offering video, as my Nikon D4s should be an excellent machine for videos. Challenge will be getting the agents to pay big money for videos, though.
I had a similar experience, Jake. I went from HDR, to strobes, back to HDR primarily because strobes can be incredibly time consuming and RE Agents in my area do not seem too interested yet. I don’t mind to be honest as I find blending flash and ambient shots to be a lengthy process as it seems to severely exacerbate my perfectionism which only lengthens my time editing. I am personally finding that the 7-shot bracket method works best for me, currently..
One more question for you…sorry to bombard you today…but following your guide above has my workflow a bit out of whack.
Once you transfer your images from your card to the Originals folder, do you have to sync the folder in Lightroom so that the folder of Originals shows up? Or am I forgetting something?
Nevermind…I just realized that I wasn’t on the Import screen…once I click “Import” I now see my Originals folder. Sorry for the confusion!!
Ha no worries glad you found it!
What would be a fee for someone just starting out. I have been told by realtors in my area that 75.00 is customary?
Jeff it depends on your area and what your market is used to paying. With that being said, there are always clients for Walmart and always clients for Neiman Marcus. Don’t base your pricing off what your competitors are doing, because they may be doing a crap job! I am able to charge more than the “big-box” competitors because I offer a more personal and consistent service. If you deliver a product of higher quality, than you can charge more and agents will pay for it once they realize the service you offer is superior.
Hi Lance!
Love your website. I’m launching myself in the business and your tips are great.
Question about file size
What ratio do you use when taking pictures? 4/3?
What are the actual resolutions you use when exporting? (Large and Small?)
Thanks!
Hi John,
Glad you found the site! Yes 4:3 ratio, just default to what my camera is. Full size are not adjusted for size… I deliver the full version of the photo. For small size I adjust the width to 1024 as my local MLS recommends that size for uploading.
Great! Thank you for sharing, Lance!
Lance,
I’ve gotten a lot from your video’s, but I find that I don’t have FULL or SMALL in my Lightroom under export. Where is that coming from? Is it something that I need to add as a preset?
Thanks in advance..
Hi Steven,
Glad you found the videos useful! Yes the FULL/SMALL exports are presets I created myself. Under the Export window, select all of the settings you want. Before you hit Export, hit the Add button to the left to save the present into your User Presets list. You will then be able to select it in the future instead of resetting all of the settings.
Do you have an efficient way of naming each of your pictures and getting them into the correct order you want? Do you do it after enfusing images?
Thanks!
Hi Cherie!
The naming is up above under the File Naming section. Nowadays I just upload to ViewShoot.com and ir renames for me off the property address.
I generally take the photos in the same order as when they are delivered. But if I get them out of order I will organize in Lightroom after blending, before exporting. ViewShoot also lets me rearrange if needed.
I do not have experience in taking photos, but have loved the real estate business for years. We owned several homes in our 30+ years and my main focus was D-CLUTTER.
I would like to take a class in Photoshop and possibly a class in photography. Is this a good idea?
I have a small cannon camera I use for my web page.
We will retire soon and purchasing a home in another state. The photos online are AWFUL. I would probably have to give my services away in the beginning to prove I can sell a house better. The problem is with the homeowner not d-cluttering their space. I really don’t want to get into staging, but this could be another avenue.
Any suggestions.?
Staging is a completely different animal. If that’s something you want to do then by all means add it as a service. In my case I don’t want to take any part in it! I like to focus my energy and skills on photography and leave the staging to the experts. My clients all know I take photos as-is, so the home should be ready prior to arrival.
I’m both a realtor and photographer, but I farm out the photo part of it to my son. It’s so true about people often not D-cluttering their place, which is not beneficial to the sale of the home. I like your website, seems to be a good system, my son is checking it out. Good luck to all!
Thanks for stopping by Randal!
Hi Lance. I’m also both a realtor and photographer. Indoors I use flambient technique and outdoors 7-bracket HDR. I’m torn between keeping RAW or TIFF after processing them and exporting them into JPEG and publishing them on our website. I don’t think that I would need them in the future. My only concern is copyrights, some small companies tend to use other’s photos. What would you recommend?
For everyday real estate/MLS shoots, I generally don’t hold on to the RAW images. There’s usually no reason that the RAW images are needed, as any modifications in the future should be minor. And if it comes down to it, a trip back to the property would allow for capturing something different. If it’s a big/important/custom type of a job, then it may be helpful to keep those RAWs just to be safe. For copyright I don’t believe you need the RAW images – I believe JPGs suffice when filing your images with the US Copyright Office.