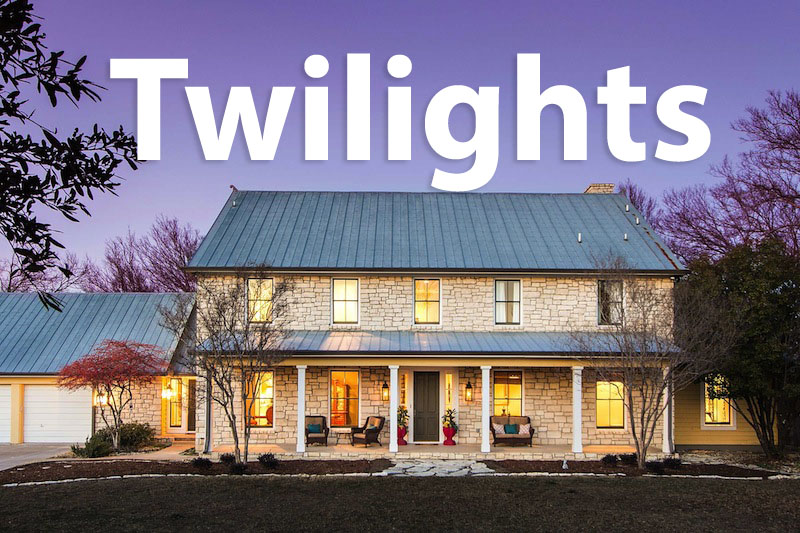
Real estate twilight photography has many advantages. It can help you build your business and client base, and it can add a high-value product to your services. Let’s first take a look at some of the pros and cons of twilights for real estate photography. Then we’ll look at a video where I show how I edited a recent twilight photo for a property.
What is a Twilight Photo?
A twilight photo is taken usually of the exterior of the property, at dusk. It is used to showcase landscape/property lighting, pool lighting and features like fire pits, and also to showcase a beautiful sunset. Agents like twilight photos because they “look cool”, and they are different from the regular exterior shot. They are more likely to grab the attention of the buyer when a home search is performed and thumbnails of properties are returned.
Benefits of a Twilight Photo
- They look cool. They just do. (Although they have to be done correctly!)
- They showcase property lighting that a buyer generally doesn’t see because they most likely are viewing the home in daylight.
- They allow you to stick out from your competition by offering a service they don’t offer.
- They allow you to add a high-value (aka $$$) service to your product list.
- They bring clients to you who normally list higher-end properties, and are more likely to use twilight photography services.
Disadvantages of a Twilight Photo
- The end result can look so cool that it’s not very realistic to what buyers will see in person.
- They take time.
- They require you to schedule your shoot at sunset which could be rather late in the evening hours of summer months.
- Because they are done so late in the day, you may need to lighten your schedule earlier in the day or lighten the following day so you have time to process shoots and meet deliverables.
How to Take a Twilight Photo for Real Estate
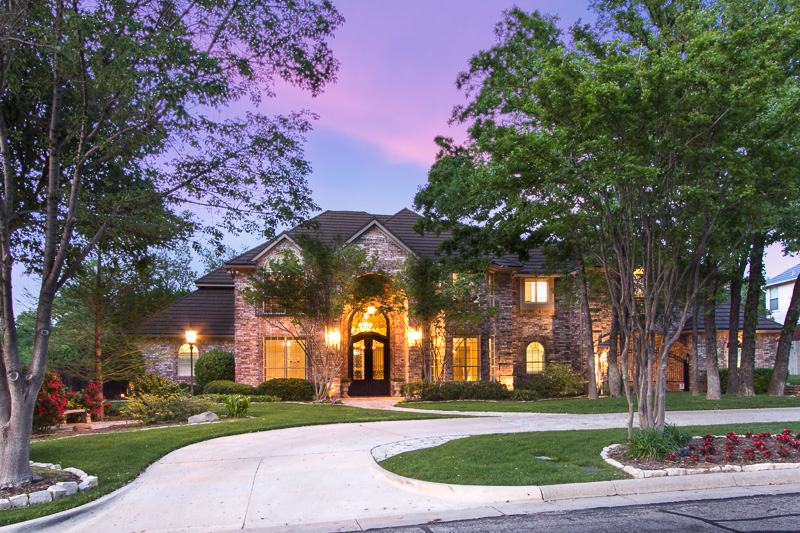
The above photos is the end result. Click play on the video below for a behind-the-scenes look at the editing process when creating a twilight photo.

And here is a summary of the process explained in the video:
- Best Time
- I take the twilight photo around 15 minutes after “sunset time”. Sites like wunderground.com will show you when sunset is expected based off your area.
- Have the agent/seller remove solar screens/window coverings, and open the blinds
- Turn on all interior and exterior lighting
- Shoot from tripod so the camera doesn’t move between exposures
- Shoot at f/7.1 @ 320ISO
- Chimp with the promote control, going from a dark exposure to a bright exposure
- You want an exposure where you can see some of the interior through the windows, an exposure for a well-lit exterior and an exposure for a “white sky”
- We use a “white sky” exposure to replace the sky with a new sunset
- Pull the 3 selected exposures into Photoshop, via Edit In… Open as Layers in Photoshop.
- Put the brightest exposure as the top layer, then medium, then dark should be bottom layer
- Copy/paste a new sunset sky onto its own layer
- Using layer masks, blend in sections of each layer where appropriate
- Delete the white sky out of the top layer to allow the sunset sky to be visible
- Flatten the image and close it, saving to Lightroom
- Make final tweaks/adjustments where necessary
Enjoy shooting twilights!
Lance, It would be really helpful to have access to those pictures so we could practice. I would like to feel proficient at this before I offer it to clients. Any chance you could provide the 3 pictures and the background?
Hi Josie,
I apologize but I don’t have the files any longer. You could offer a couple of free shoots to an agent so you can practice and not feel pressured to deliver a perfect product. 🙂
Really wonderful tutorial – I’m shooting my first house tonight and can’t wait to give this technique a try for a dramatic finished product.
Good luck Susan! 🙂
WOW! Amazing tutorial- thank you so much for sharing. You wouldn’t believe all of the different exposures I have tried on my camera to achieve this effect… and now I see the magic of photoshop!! Thanks again!
You’re welcome. 🙂
Fantastic tutorial. Helped me a treat.
Thanks for the putting the effort in Lance. Much appreciated.
Jon
You’re welcome!
Hi Lance, I have Promote Control, but I’m not familiar with Chimp.
Hi Paul,
Chimping is just a way of finding your exposure by “guessing”. You take a shot, examine the LCD, and make adjustments to your shutter as needed. You keep doing that until you find the brightest exposure you think you’ll need, and you then plug that shutter speed into the Promote Control to get your desired bracket.
Great job with sky dropped behind the trees. Assuming that you edited with a 300 dpi image, what feather setting did you use for the selection?
Thanks.
Hi Jim,
I usually feather 1-3px.
Lance, what about 3x or 7x HDR bracketing? I’m a fan of HDR usually shooting at ISO 100, f/9 and let the speed do its thing . Using 5d/mkiii, 7d/mkiii
Thoughts?…?
I don’t do twilights much but I don’t see why bracketing/HDR wouldn’t work great. May lose some control over color balance but I bet it ends up with a great result. 🙂
thank you for the article. how many shots will you typically do of the exterior during twilite shoot?
Just one if all we need is the front. Will take 2-3 of the back if they have nice landscaping, pool, etc.
Hi Lance, a few quick questions on this if I may.
(1) I have had a request for a multiple shot twilight shoot so I’m looking for ways to get 3 twilight shots done in one shoot? How do you get 3 or 4 twilight shots done in one twilight shoot?
(2) For 3 or 4 shots, in relation to sunset or golden hour what time do you start and how long do you usually spend on each image.
(3) When starting earlier do you start of with the white sky image & speed up the shutter to decrease exposure for the windows and building or do you stick with the average and increase the number of images in your bracketed set to encamps the full range required? Or some other way?
Thanks
Today, I just use my camera’s bracketing for 3 frames, 2 steps apart for each frame. I mostly let the camera handle the exposure in AV mode, and just use exposure compensation to go brighter/darker where necessary.
Once I’m comfortable with the light outside, I take three brackets then move to the next. So it goes quick. I’m not using flashes so it’s justmoving to the next location and hitting the shutter.
Hi Lance,
I’m sorry, but I can’t find the video for the editing process for twilight shoots. I’ve watched it before, but now I can’t see the link “below”. Am I just missing it? I would love to watch it again.
Thank you,
Stefani
Hi,
It’s back! A plugin on the site was disabling the video embed and other images on the site. Thanks for pointing it out!
Lance, starting 15 minutes after sunset seems quite late in the process. Is it not too dark by then? I assume your first image is showing the scene at or close to the average exposure setting in your camera. Is that right?
Thanks
Hi Gary, I find the time the weather apps say for “twilight” is too early, hence starting 15 minutes later. Do some practice runs to see what you are most comfortable with.
What would you charge a client for this type of shoot?
Jennifer I am always cautious giving out pricing info. I clearly have my pricing info on my website, but I withhold twilight pricing. Why? Because I don’t want to advertise that I do it. It keeps me out late at night, and makes editing that much more difficult when I get home late and have to have everything returned back to the agent the next day.
But in all honesty, you should charge what you think it’s worth. You can only do one per day, so it has exclusivity value to it. It keeps you from your family or home and out late, and potentially makes you stay up really late editing photos depending on how quickly you give clients your images. So it may be worth $75, it may be worth $150. It all depends on what your time is worth.
Thanks! We have one coming up but we haven’t don’t one before and didn’t know where to start. But we were leaning towards $150. Great video!
I Lance, is there a trick to make the driveway look wet? The realtor asked me to do a twilight with the driveway wet. The problem was it was a hot day with the sun on the concrete all day. I wet it down, went back to make my final adjustment and the driveway had dried out. After trying it again I had the same result, it dried out before I could finish the shoot.
Any suggestions?
Chris
Hi Chris!
I actually haven’t ever wet a driveway before for that same reason! It’s simply too hot here. That, and I don’t want it to be spotty with puddles that haven’t dried out, etc. I have been asked before but have yet to give it a shot. Perhaps there is a way to do something in the post-processing side of things in PhotoShop? But I’m not aware of what that may be.
Sorry that I don’t have much input!
Lance
Hi Lance,
Would be interested to know where you get your twilight skies you use in replacements? From your own library? I am just getting started doing twilights and have an album of blue skies I use for daytime sky replacement on cloudy days but looking for dramatic skies for twilights.
Thanks!
Hi Caroline,
That’s correct, they are from my own library! I recommend taking some yourself so you get skies that are true to your area. Pick a couple of nice days in the near future and go out during sunset and grab some from all different angles. 🙂
Lance
I pass by listings with the night photos. I assume that the house is too ugly to be photographed in the day
Interesting observation Jo! But I can see why you would think that! Most agents think it helps their listing stick out from the rest. However with so many people doing them, I don’t know if that’s really the case any longer.
I’ve done it with HDR with good results, but I do get some blur of moving objects from the long exposures(airplanes, the moon, etc…). I think doing it manually in Photoshop is a better approach. The new trick now seems to be creating a twilight shot from a daytime shot, by creating a duplicate photo and setting the Temperature all the way warm. Then blend in the lights using a layer mask, and then paste in a twilight sky. Voila! I prefer the real deal!
Hey Lance
Really nice job, usually in which mode do you blend layerd?
Hi Lance, As I am living on the east coast, its difficult for me to get a good twilight sky as well as a starred sky as well. Do you know where may I get those images to use as layers? Thanks,
Thank you for sharing. I will definitely try this on my next twighlight shoot.